JPD Select HELP
This is a short but focused tutorial on using JavaProtein Dossier for quick inspection of the structure/function parameters for the ALPHA-CHYMOTRYPSIN (E.C.3.4.21.1) COMPLEX WITH TURKEY OVOMUCOID THIRD DOMAIN [SOURCE BOVINE (BOS $TAURUS) PANCREAS AND TURKEY (SOURCE GALLOPAVO)], a protein structure described in the PDB file 1cho.pdb.
Please confirm first that
your PC is fully compatible with BLUE STAR STING:
Please see "BLUE STAR STING Requirements" at our web page.
What you need to have previously installed at your computer is:
A) PC MS WIN XP or Linux Red Hat 7.3/8.0
B) Netscape/Mozila 7.0 (or IE 6.0 sp1)
C) CHIME 2.6 sp3/sp4
D) Java 1.3.1
E) No firewall
F) Install properly SeaView and TreeView
1. Start BLUE STAR STING
(DS)!
_______________________________________________________________
2. How to start JPD?
Click on Java Protein Dossier at the menu on the left side (Programs)
After that, click on the STINGit area (gray background color) which will
bring up JPD with a default PDB file (1cho.pdb) for you:
First, the Chime window will open
Second, the DS sequence window will open (check if your configuration
is proper for using BLUE STAR STING by clicking repetitively the Refresh button
at the DS sequence window: if it works - the structure in the Chime window
should show successive wireframe, backbone, ribbon renderinDS of the molecule)
Third - the "Split on" window will open (just click on
OK)
Forth - JPD window will open.
____________________________________________________________________
3. How to read
properly data from JPD?
Use "HELP" for understanding how to manage hundreds of possible
views,
but start seeing just the general instructions. The JPD Help relays heavily
on picture talk, a way (we consider sufficient) to grasp a basic concept
of JPD functionality.
Click on the Mol.Biol.View and select View ALL.
____________________________________________________________________
4. How to get a printed copy of the data of interest?
You may click on modules at the BLUE STAR STING sequence window and select
STING Report;
Enter the amino acid sequence number (for example, for one of the residues
from the ensemble selected in the exercise described bellow) and you will
get the GIF images for all important parameters (produced by the BLUE STAR
STING components) for this particular residue.
__________________________________________________________________
5. How to select amino acids that:
A) belong to the IFR area, AND
B) at the same time they have a negative electrostatic potential AND
C) at the same time they have the Relative entropy and Evolutionary Pressure
very low (<20) (based on both HSSP and SH2Qs
data), AND
D) they have a high reliability (>50 for HSSP and >75 for SH2Qs)
for the estimate of the latter two parameters?
A)
Click on the icon showing the "IFR" in the JPD icon area. This
will induce JPD to select only those amino acids which are located in
the interface area (all residues now displayed will be underlined with
the red wiggly line).
For the 1cho.pdb you should see the following picture:
B)
Next, click on the icon showing the magnifying glass (SELECT) in the JPD
icon area. At the select window, go to the item "Physical-Chemical"
and there click on "Electrostatic Potential".
Next, un-mark all except for the SURFACE.
Now, bring the sliding roller below "Maximum" to the position
where it will show value of "-1". Here you have to be a bit
patient in order to hit the "-1" value exactly. Once you are
close, use your arrow keyboard keys to adjust to exactly to "-1.
You will be able to read the final selected value by placing the mouse
above the sliding roller button.
For continuation of the test case above (1cho.pdb, already selected to
show ONLY the IFR residues) you should obtain a following result:
C)
Next, click on the "Conservation" and "HSSP".
Now, slide the roller to the position 20 for all tree parameters: Relative
Entropy, Relative Entropy(100) and Evolutionary Pressure. Leave the "<"
">" marked for the "<" sign.
Next, Leave the "<" ">" marked for the ">"
sign at the "Reliability (x100)" and place the roller above
value "50".
Next, click on SH2Qs and slide the roller to the position 20 for all tree
parameters: Relative Entropy, Relative Entropy(100) and Evolutionary pressure.
Leave the "<" ">" marked for the "<"
sign.
Next, Leave the "<" ">" marked for the ">"
sign for the "Reliability (x100)" and place the roller above
the value "75".
Click on OK!
What you have done is to SELECT all residues which are located at the
Interface between chains E" and "I" AND
at the same time having the EP<0 AND at
the same time having low Relative Entropy and Evolutionary Pressure (<20)
for both HSSP MSA and SH2Qs MSA, AND with
the reliability of the estimate for the latter "Conservation"
parameters being >50 and >75, respectively.
Final result is shown at the last figure above.
NOTE: there are no amino acids at the "I" chain which satisfy
given set of conditions and this is why JPD will worn you about it by
means of the msg edited in the special window.
A biological meaning of this exercise is that a user is looking at the selected number of residues which belong to the Chymotrypsine, which are located at the interface with the inhibitor, having a negative electrostatic potential at the surface formed by them and are very preserved in terms of evolution. Consequently, a user is looking at functionally important residues.
Any combination of select conditions is possible, making this procedure a very powerful tool for the identification of functionally/structurally important regions/sites.
Note: most of the conditions set by a user in SELECT areas are working as logical AND. However, there are options where user may choose to select among parameters using logical OR function. Explicit option for such logical function is given in the JPD SELECT window.
__________________________________________________________________
6. How to save a residue selection?
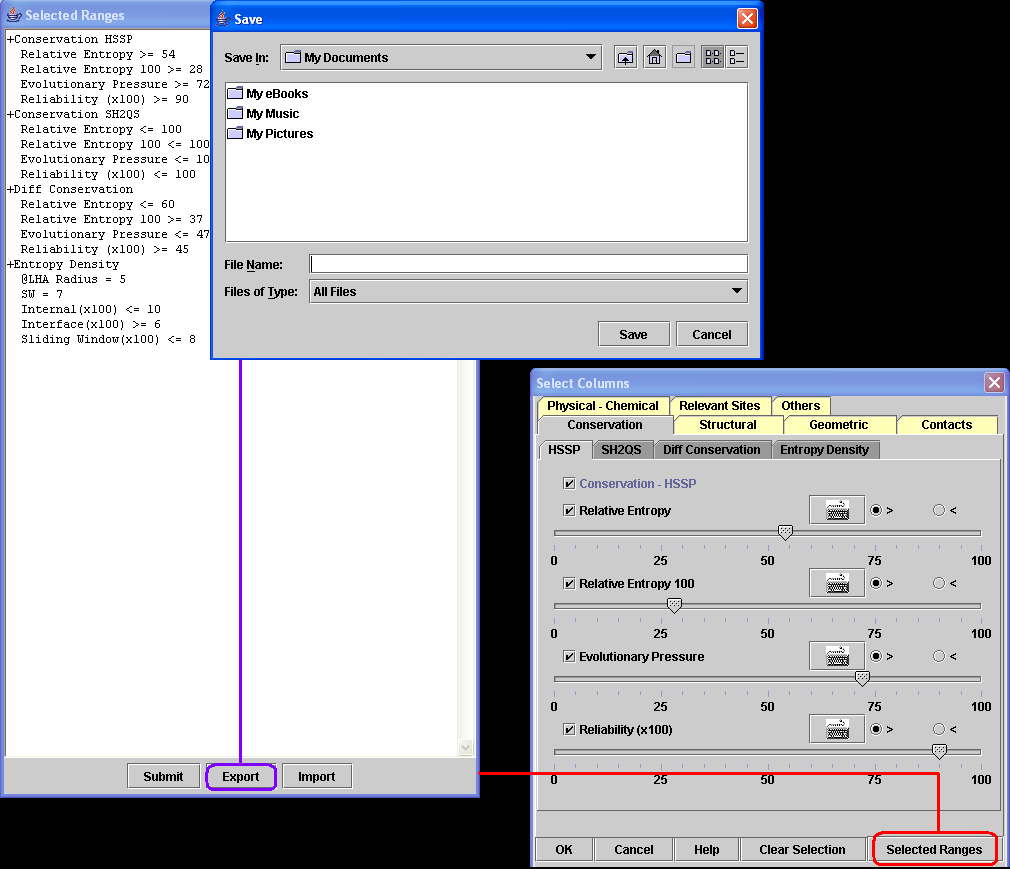
A) Click on the button "Selected Ranges".
B) Click on the button "Export" at the "Selected Ranges" window.
C) Informe the file name and then click "Save".
__________________________________________________________________
7.How to import a residue selection?
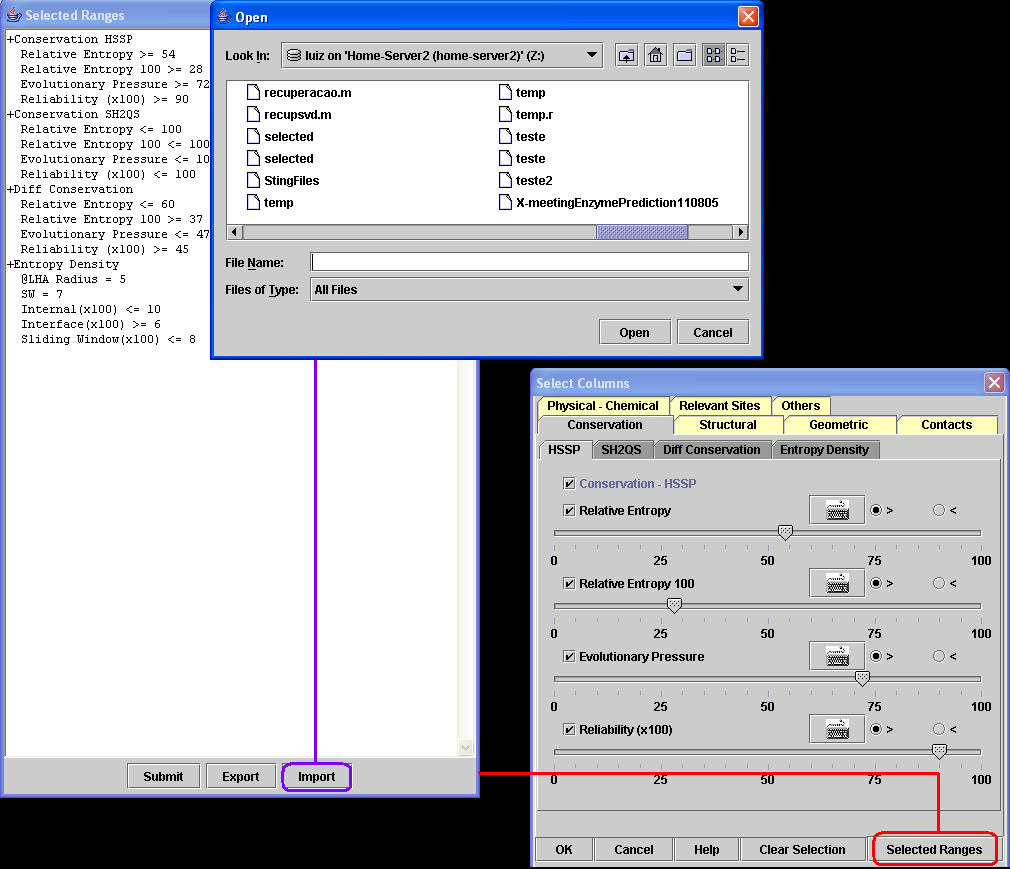
A) Click on the button "Selected Ranges".
B) Click on the button "Import" at the "Selected Ranges" window.
C) Informe the file that contains the selection and then click "Open".
D) Click on the button "Submit".